How to Use the Image Tools in Design & Print Online
 |
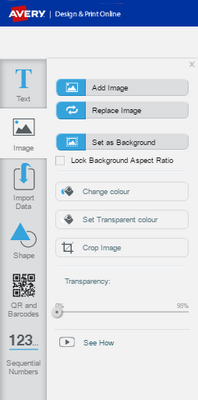
When you click on an image in a template, or if you click on the Image button on the left of the Customize screen, the Image options will appear. To add a new image, click the Add Image button. If there’s an existing image on your design that you want to replace, click on it and then use the Replace Image button. |

You have several choices for the sources of images:
- Your Computer: Click the Browse for File button to browse to find the image you want to use. Note: ai, bmp, eps, jpg, jpeg, pdf, png, psd, svg and tiff files are supported.
- From Avery Gallery: There are lots of free clipart images to choose from . Use the categories on the left to find the right type of image for your project.

- From Facebook, Instagram, Flickr or Google Photos: Log in to your social media accounts and select your favourite photos.
You also have the option to Set image as a background. Be sure to click the Lock aspect ratio box if you don’t want it to stretch.

To add a solid background colour instead of an image, use the Background tool at the top of the screen.

Here’s how to change the Fill Colour, Remove a Colour, Crop Image or apply Transparency:
- To change a solid colour, click Change Colour, then pick a colour from our selection or insert a Hex Colour reference*. Your cursor will then turn to a paint bucket – with this, select the part of the image you want the new colour applied to.
- If you want all the parts of the image that are that colour to be replaced, check the Fill matching areas box.
- You can also select a colour from a different part of your design. Click on the Select colour from image tool to activate the eyedropper and then click the colour on your image that you want to paint with. The paint bucket cursor will appear for you to choose what image you want to change.
* A hex code is a six-digit, hexadecimal number used in HTML, CSS, SVG, and other computing applications to represent colours.
Cropping: click on the image you want to change, then click the Crop image button. Corners will appear on your image: drag the edges to remove the bits you don’t want. When you click off the picture, it will be cropped.
Transparency: To remove a solid colour from an image, first click on the image. Next, click the Set Transparent Colour button and click the area of the image to be transparent. This is great to remove the white background from a logo or other image on brown kraft, neon or other coloured Avery products. You can also make an entire image transparent or opaque by selecting the image and using the Transparency slider. This is great for making text show over the image, which might require using the Object List to arrange the layers of your project (see above).
You can increase or decrease the size of an image by clicking and dragging on the circles on the border of the image. Move the image around by clicking on the image, then hovering on the edge until the four arrow icon appears. You can then click and drag the image to move it. You can rotate an image using the blue circular button at the top of the image.
To move an image, click on the image to select it. Then hover your cursor over the edge of image until the four arrows appear, and click and drag it to where you want it. You can also click on the image to select it and then use the arrow keys on your keyboard to move it up, down or to either side. Hold down the shift key while you click on an arrow key to make smaller moves. To resize an image, click on the corner and drag to stretch.
Remember! You can use the Undo button to reverse any changes you don’t like!
When you’re happy with your design, click Save, then Preview & Print to continue.

Validate your login